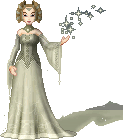
 |
 |
 |
| 1. Start with your completed doll that you want to add the glow to. AS you've probably noticed, I'm rather partial to glowy, floating stones, but it's up to you. A candle or lantern would look good too. | 2. Create a new layer called "Glow" on top of any other layers you have on the doll. Set your background to the colour you want the glow to be & set the foreground to no style. | 3. Click on the Shape tool and use the setting as shown. |
 |
 |
 |
| 4. Draw a big circle centred over what you want to be glowing - in this example, the tear-drop stone. | 5. Go to Effects/Blur/Gaussian Blur... & apply a blur with a radius of 5. | 6. Apply another two blurs with a radius of 5 and a fourth blur with a radius of 10. |
 |
 |
 |
| 7. Now you have a couple of choices. Feel free to experiment, but these are two that I find work rather nicely. On the Layer Palette, either set the Layer Blend Mode to Screen & drop the Opacity of the layer down to about 70%... |
8. Or, set the blend mode to Dodge and drop the Opacity down to about 60% | 9. Duplicate the glow layer and set Blend Mode to Dodge. Drop the Opacity to about 30%. |
 |
 |
 |
| 10. I suggest you save the doll at this point and create a duplicate (press SHIFT+D). On the duplicate, go to Layers/Merge/Merge All (Flatten). On the Layer Palette, there will now be only 1 layer called Background | 11. On the Layer Palette, right-click on the Background and choose Promote to Layer. | 12. Use the Magic Wand tool and select the area outside of the doll. Press Delete on the keyboard. We are doing this to remove the bits of glow that are not on the doll or glowing object. |
 |
||
| You should now have a lovely, glowy, transparent doll! Don't be afraid to mess around with the layers until you get a look you like. | ||
| << back to tutorials | ||
 dolls
dolls  bases
bases  resources
  tutorials
  contest
  links
links  doll maker
  faq
faq  about
about  forum
forum  guestbook

