
| Please note: These are just my ways of doing things in Paint. I don't use it very much, so there may be easier/quicker ways to do what I am doing, feel free to play around! | ||
 |
|
 |
| 1. You will need a base to work with. If you don't already have one, go to my bases section and save one onto your PC. You may want to complete my preparing your base tutorial before we start. | 2. Feel free to use you own colours, but I have made some palettes to make it a little easier for you - you will find them at the bottom of the page. Alternatively, have a go at making your own. To use the palette, go to Edit/Paste From and locate the colour palettes from where you saved them on your PC. This will open them into the same document as your doll. For this tutorial, you will need the black palette & a coloured palette. |
3. Once in Paint, click on the  Brush tool and choose the smallest brush size. Brush tool and choose the smallest brush size.You could use the  Pencil tool instead, if you want, but I always find the Brush easier as you just have the "cross-hair" cursor and thins makes it much easier to see what you are actually doing. Pencil tool instead, if you want, but I always find the Brush easier as you just have the "cross-hair" cursor and thins makes it much easier to see what you are actually doing. |
 |
 |
 |
4. Use the  Pick Color tool to select colour 1 from your palette. Draw in the outline of the dress. As this is a fantasy dress, I'm not too worried about realism, so I've gone for some really foldy folds at the bottom. Pick Color tool to select colour 1 from your palette. Draw in the outline of the dress. As this is a fantasy dress, I'm not too worried about realism, so I've gone for some really foldy folds at the bottom. |
5. If you're having problems with the folds, try to imagine them as a series of S shapes & reverse S shapes which are joined together. | 6. Select colour 5 & fill in the interior of the dress. While you are doing so, tidy up the outline of the dress so that it is no more than 1 pixel thick at all points. |
 |
 |
 |
| 7. Fill the interior of the sleeves with palette colour 3. | 8. Use colour 2 to draw in the shading from the folds at the bottom of the dress, to shade around the bust & add shading on the interior sleeves. When you're shading the folds, you are shading the bits that fold inwards, not the bits that bulge outwards. |
9. Select colour 3. Expand the shading on the folds that fold inwards. I have also lined both sides of the dress with this colour to soften the edge. Add shading on the arms & around the bust. I've added a few folds around the waistline as well. |
 |
 |
 |
| 10. Use colour 4 to expand the exiting shading. This is the colour that soften the shading & makes it all blend together. Add some shading for the folds that bulge outwards as well. | 11. Use colour 6 to add highlights to the folds that bulge outwards & to the bust. | 12. This is looking pretty good, & if you're happy with your dress you can stop here. However, to add some tecture & to get the colours to blend together even better, we are going to add some dithering. This means we're going to add pixels in a checkerboard pattern at the edges of each band of shading to get them to merge into each other. |
 |
 |
 |
| 10. You should end up with something like this. | 11. Using colour 3, add some fabrinc behind the folds that bulge out. | 12. If you want, add some decorations & embellishments to the dress |
 |
||
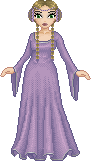
| Your dress is complete! | ||
| << back to tutorials | ||
 dolls bases resources tutorials contest links doll maker faq about forum guestbook


